How to Know if You Initialized Firebase
Introduction
In this tutorial we will add Firebase to a Adjacent.js website. If you are using another react based framework, the procedure should be very similar and yous should become something out of this tutorial.
Nosotros will first connect the website to Firebase (which is a step in itself), so we'll add the post-obit functionalities in the post-obit club:
- Authentication
- Cloud Firestore
- Realtime Database
- Storage
Initialize Firebase
First, brand sure you have a Firebase project. You can create one here if y'all practise not have 1.
Create a folder called firebase and inside of that folder create a file called initFirebase.js. We will add all our firebase related functionality inside of this binder.
At present, install the 2 dependancies:
yarn add firebase firebase-admin Import these within of initFirebase.js.
If you lot oasis't already, create a spider web app inside of your Firebase project. Once you go through those steps, you will exist able to download your credentials. From here, create a file called .env and paste in the secrets. Your file should wait like mine (Except with your secret variables obviously!).
NEXT_PUBLIC_FIREBASE_API_KEY = NEXT_PUBLIC_FIREBASE_AUTH_DOMAIN = NEXT_PUBLIC_FIREBASE_DATABASE_URL = NEXT_PUBLIC_FIREBASE_PROJECT_ID = NEXT_PUBLIC_FIREBASE_STORAGE_BUCKET = NEXT_PUBLIC_FIREBASE_MESSAGING_SENDER_ID = NEXT_PUBLIC_FIREBASE_APP_ID = # for firebase-admin FIREBASE_CLIENT_EMAIL = FIREBASE_PRIVATE_KEY = Nosotros tin now utilize these secrets to initialize Firebase. Your initFirebase file should wait like this:
import firebase from 'firebase/app' // the below imports are option - comment out what you don't need import 'firebase/auth' import 'firebase/firestore' import 'firebase/storage' import 'firebase/analytics' import 'firebase/performance' const clientCredentials = { apiKey: process. env . NEXT_PUBLIC_FIREBASE_API_KEY , authDomain: process. env . NEXT_PUBLIC_FIREBASE_AUTH_DOMAIN , databaseURL: process. env . NEXT_PUBLIC_FIREBASE_DATABASE_URL , projectId: process. env . NEXT_PUBLIC_FIREBASE_PROJECT_ID , storageBucket: procedure. env . NEXT_PUBLIC_FIREBASE_STORAGE_BUCKET , messagingSenderId: process. env . NEXT_PUBLIC_FIREBASE_MESSAGING_SENDER_ID , appId: process. env . NEXT_PUBLIC_FIREBASE_APP_ID , } Lastly, let's export a part called initFirebase() that uses these credentials to initialize Firebase!
export default function initFirebase ( ) { if ( !firebase. apps . length ) { firebase. initializeApp (clientCredentials) // Cheque that `window` is in scope for the analytics module! if ( typeof window !== 'undefined' ) { // Enable analytics. https://firebase.google.com/docs/analytics/get-started if ( 'measurementId' in clientCredentials) { firebase. analytics ( ) firebase. functioning ( ) } } panel . log ( 'Firebase was successfully init.' ) } } Now that Firebase is initialized, we can brainstorm to use it.
Deject Firestore
We will start off with cloud Firestore.
Write
Create a folder named components. Inside of this folder, create a binder called cloudFirestore. All of our cloud Firestore related components will go inside of here. Within of hither, create a file named write.js. In here we will:
- Import Firebase
- Import cloud Firestore
Then, create a bones React component named WriteToCloudFirestore. Your file should wait similar this:
import firebase from 'firebase/app' import 'firebase/firestore' const WriteToCloudFirestore = ( ) => { render ( <div style= { { margin: '5px 0' } } > < /div> ) } export default WriteToCloudFirestore To send data, nosotros need to create a function sendData. We volition then invoke this function on a button press. We'll wrap it in a effort take hold of loop as well.
import firebase from 'firebase/app' import 'firebase/firestore' const WriteToCloudFirestore = ( ) => { const sendData = ( ) => { try { // write data hither } catch (mistake) { console . log (error) alert (error) } } return ( <div style= { { margin: '5px 0' } } > <button onClick= {sendData} > Send Data To Cloud Firestore < /button> < /div> ) } export default WriteToCloudFirestore To write data, we access the firestore method on the firebase object. We take hold of the collection called myCollection(can be any name you like), we grad the document called my_document(can be any name you lot like), and so use the set() method. It looks something like this:
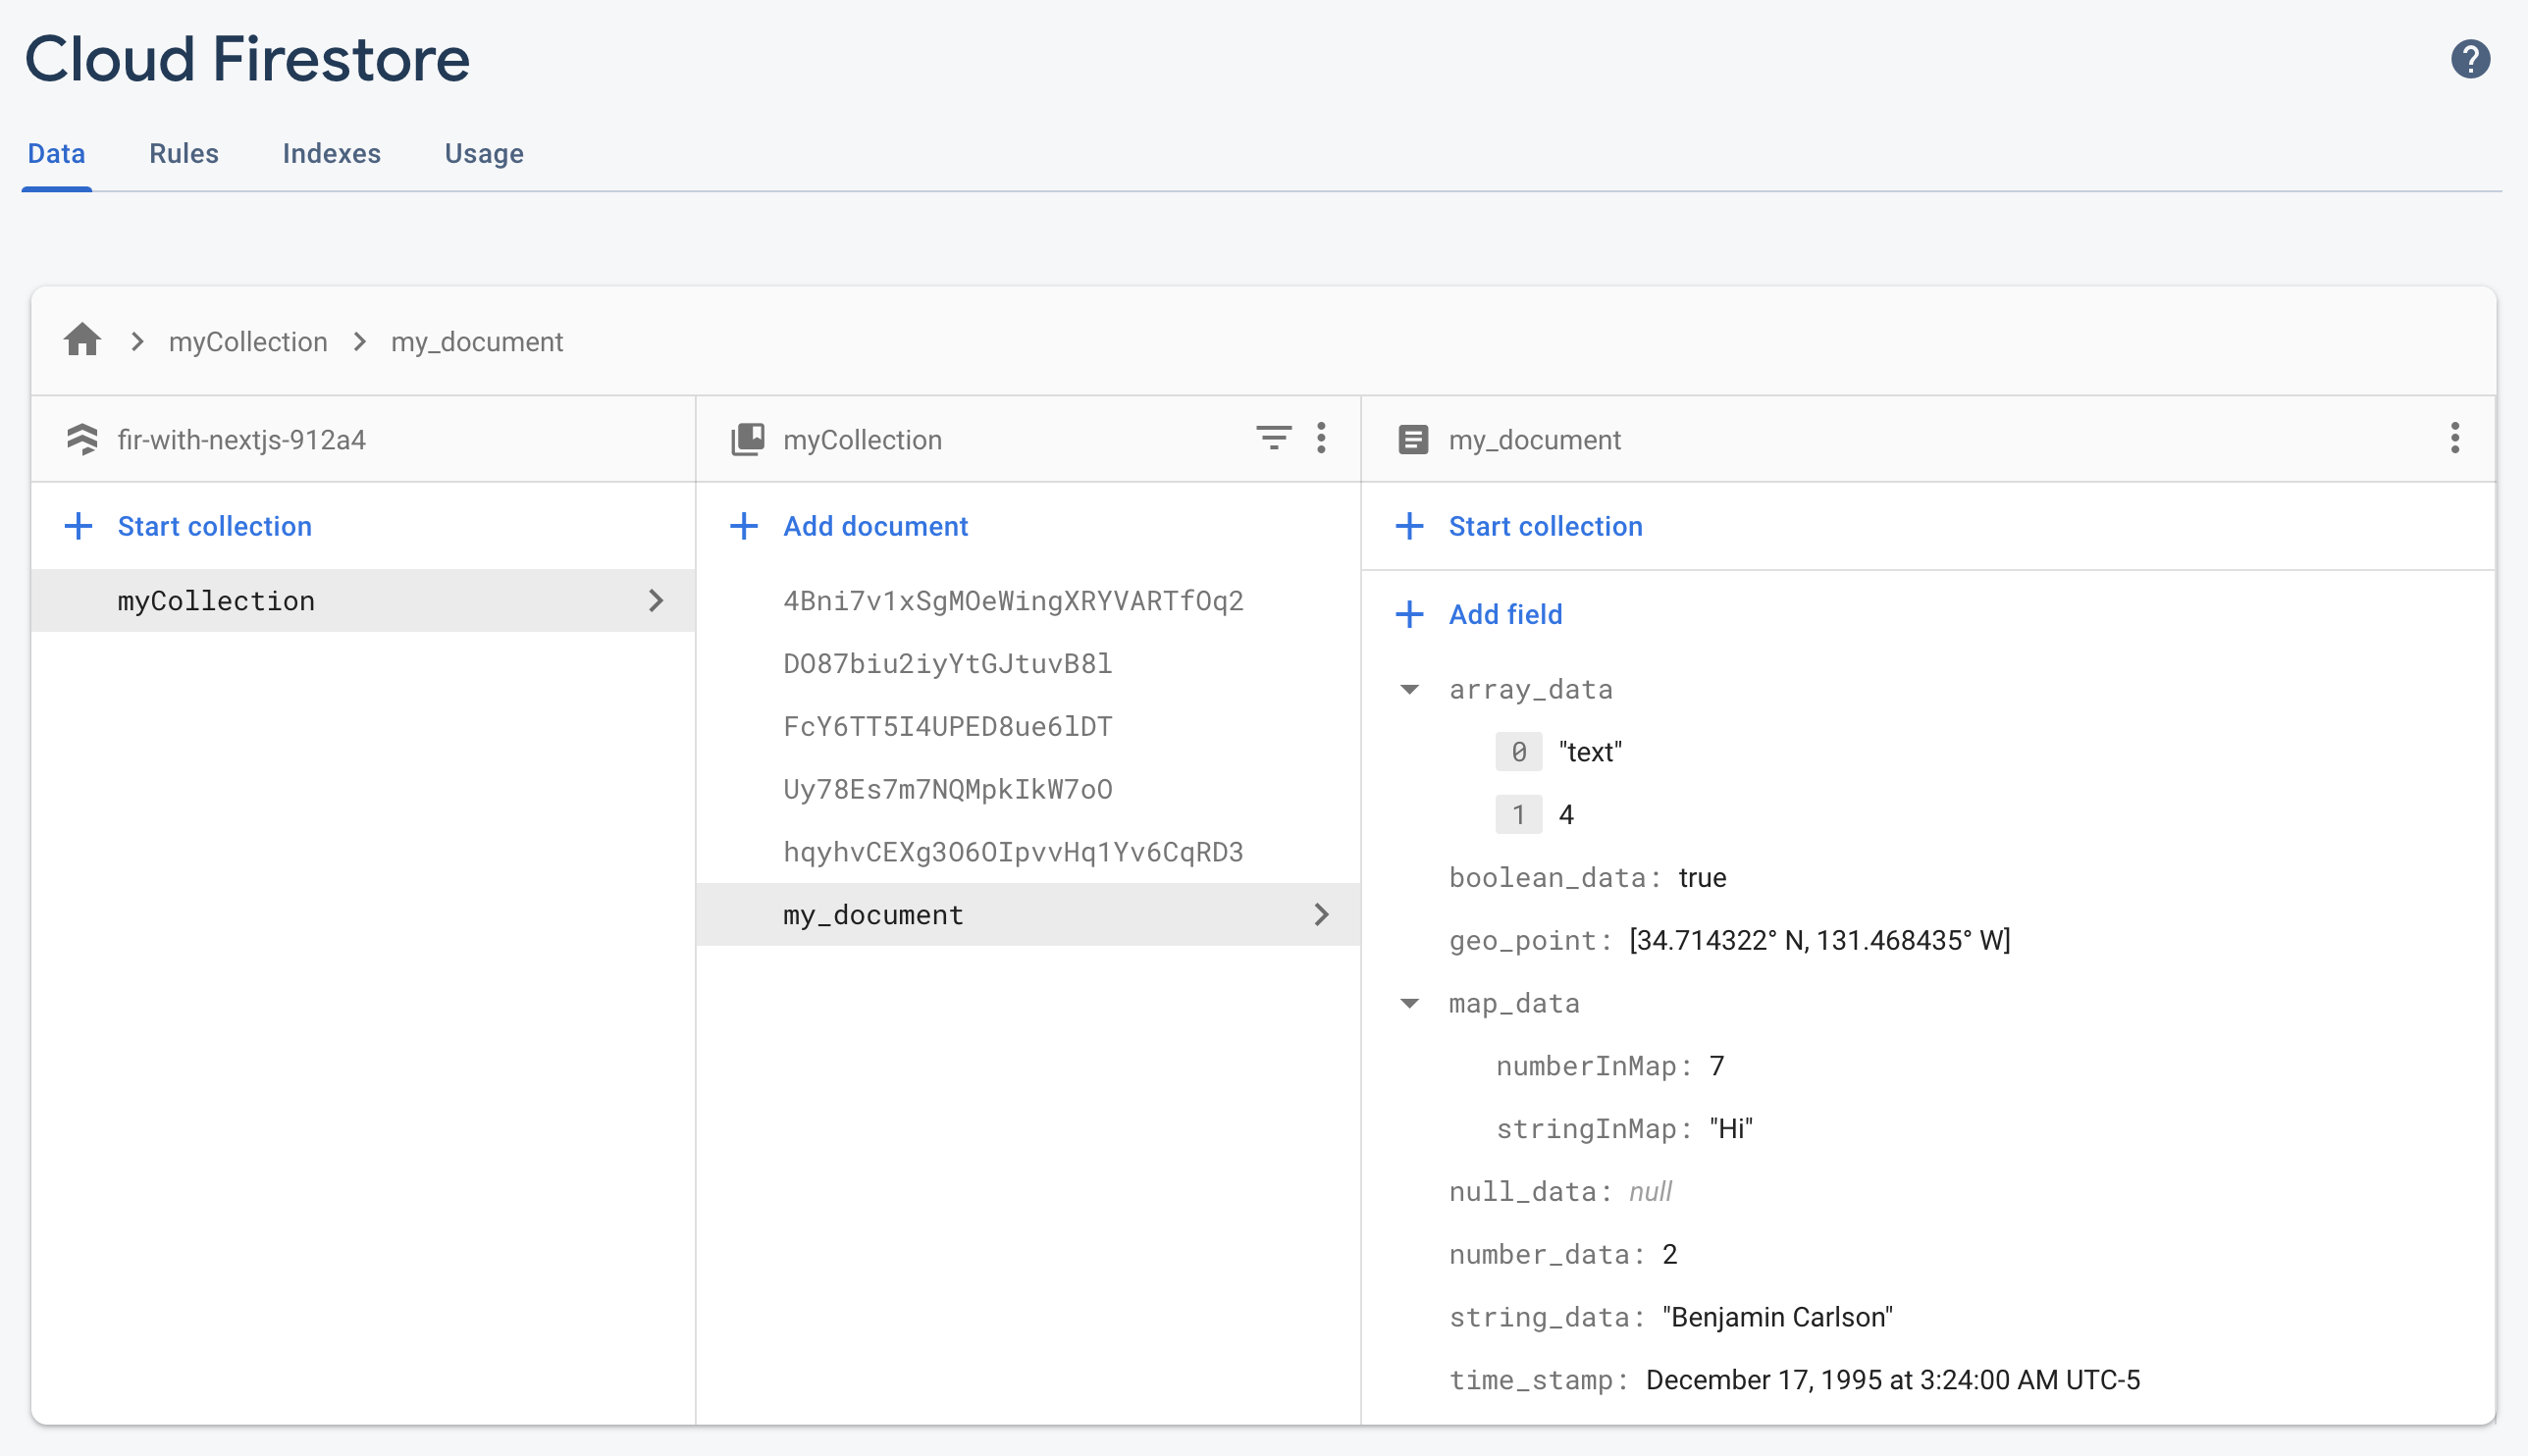
firebase . firestore ( ) . collection ( 'myCollection' ) . doc ( 'my_document' ) // leave every bit .doctor() for a random unique doctor proper name to be assigned . set ( { string_data: 'Benjamin Carlson' , number_data: two , boolean_data: true , map_data: { stringInMap: 'Hi' , numberInMap: 7 } , array_data: [ 'text' , 4 ] , null_data: goose egg , time_stamp: firebase. firestore . Timestamp . fromDate ( new Date ( 'December 17, 1995 03:24:00' ) ) , geo_point: new firebase.firestore.GeoPoint ( 34.714322 , - 131.468435 ) } ) . then ( alert ( 'Data was successfully sent to cloud firestore!' ) ) When we put it all together it looks like this:
import firebase from 'firebase/app' import 'firebase/firestore' const WriteToCloudFirestore = ( ) => { const sendData = ( ) => { attempt { firebase . firestore ( ) . collection ( 'myCollection' ) . md ( 'my_document' ) // leave as .doc() for a random unique doc proper name to be assigned . set ( { string_data: 'Benjamin Carlson' , number_data: two , boolean_data: truthful , map_data: { stringInMap: 'How-do-you-do' , numberInMap: 7 } , array_data: [ 'text' , four ] , null_data: zero , time_stamp: firebase. firestore . Timestamp . fromDate ( new Engagement ( 'December 17, 1995 03:24:00' ) ) , geo_point: new firebase.firestore.GeoPoint ( 34.714322 , - 131.468435 ) } ) . and so ( alert ( 'Information was successfully sent to cloud firestore!' ) ) } catch (error) { console . log (error) alert (fault) } } render ( <button onClick= {sendData} > Send Data To Cloud Firestore < /button> ) } export default WriteToCloudFirestore Imort this component within of index.js and printing the push button. Yous should see a success warning and if you lot navigate to Firbase you should see the data.
Read
Now let's read this data. Create a file named Read.js in the same folder as Write.js. Make a component named ReadDataFromCloudFirestore(). Inside of it create a button, with an onClick issue which invokes a role named readData. Your file should look like this:
import firebase from 'firebase/app' import 'firebase/firestore' const ReadDataFromCloudFirestore = ( ) => { const readData = ( ) => { } render ( <button onClick= {readData} > Read Information From Cloud Firestore < /button> ) } export default ReadDataFromCloudFirestore At present, within of the method lets read the data by invoking the firestore() method off the firebase object. Select the collection and the certificate the same way as before. Adjacent, use the onSnapshot method. Inide of it, create a office and console.log the data. The data is within of physician.data(). The doc object is the entire response. Here is the consummate file:
import firebase from 'firebase/app' import 'firebase/firestore' const ReadDataFromCloudFirestore = ( ) => { const readData = ( ) => { endeavor { firebase . firestore ( ) . drove ( 'myCollection' ) . doc ( 'my_document' ) . onSnapshot ( function ( doc ) { console . log (doc. data ( ) ) } ) alert ( 'Data was successfully fetched from cloud firestore! Shut this alert and check panel for output.' ) } catch (error) { panel . log (error) alert (error) } } return ( <push onClick= {readData} > Read Data From Cloud Firestore < /button> ) } export default ReadDataFromCloudFirestore Import this function into alphabetize.js and you'll see your data in the console!
Authentication
Create a folder chosen Auth inside of your components folder. Within of at that place, create a file named FirebaseAuth.js. Nosotros will be using the sign in pop upward flow from the ract firebase ui library. We'll start by importing what we need.
import initFirebase from '../../firebase/initFirebase' import { useEffect, useState } from 'react' import StyledFirebaseAuth from 'react-firebaseui/StyledFirebaseAuth' import firebase from 'firebase/app' import 'firebase/auth' import { setUserCookie } from '../../firebase/userCookies' import { mapUserData } from '../../firebase/mapUserData' Annotation, nosotros take not created the setUserCookie or setUserCookie files yet.
You might discover that we are importing initFirebase when we already take it in the alphabetize.js file. This is considering it makes more than sense to init Firebase in the auth flow rather than the index page because if you lot are edifice out a big application, the user will not always outset at the index page.
Next, paste the code below:
initFirebase ( ) // initialize firebase const firebaseAuthConfig = { signInFlow: 'popup' , // Auth providers // https://github.com/firebase/firebaseui-web#configure-oauth-providers signInOptions: [ { provider: firebase. auth . EmailAuthProvider . PROVIDER_ID , requireDisplayName: false , } , // add boosted auth flows beneath firebase. auth . GoogleAuthProvider . PROVIDER_ID , firebase. auth . TwitterAuthProvider . PROVIDER_ID , firebase. auth . GithubAuthProvider . PROVIDER_ID , ] , signInSuccessUrl: '/' , credentialHelper: 'none' , callbacks: { signInSuccessWithAuthResult : async ( { user } , redirectUrl ) => { const userData = mapUserData (user) setUserCookie (userData) } , } , } That is how easy it is to create a popup auth flow. You lot will notice that I provide multiple sign in options and set user data and cookies, which once more, nosotros accept all the same to implement.
Finally, create the bodily component and return this config inside of the pop upward auth flow that we imported from react ui.
const FirebaseAuth = ( ) => { // Do not SSR FirebaseUI, because it is not supported. // https://github.com/firebase/firebaseui-web/issues/213 const [renderAuth, setRenderAuth] = useState ( imitation ) useEffect ( ( ) => { if ( typeof window !== 'undefined' ) { setRenderAuth ( true ) } } , [ ] ) return ( <div> {renderAuth ? ( < StyledFirebaseAuth uiConfig= {firebaseAuthConfig} firebaseAuth= {firebase. auth ( ) } / > ) : cipher } < /div> ) } export default FirebaseAuth Inside of our pages folder, create a file named auth.js and add the component we just created.
import FirebaseAuth from '../components/auth/FirebaseAuth' const Auth = ( ) => { render ( <div> <div> < FirebaseAuth / > <p> <a href= "/" > Get Home < /a> < /p> < /div> < /div> ) } consign default Auth While we are in the pages folder, remove the initFirebase line from index.js every bit well.
Auth Logic
The but stuff left to do now is handle the logic. Create 4 files within of your firebases folder.
- mapUserData.js
- useUser.js
- userCookies.js
Cookies
Paste in the following lawmaking into userCookies.js. This is taken from the next.js documentation.
import cookies from 'js-cookie' export const getUserFromCookie = ( ) => { const cookie = cookies. get ( 'auth' ) if ( !cookie) { return } return JSON . parse (cookie) } export const setUserCookie = ( user ) => { cookies. set ( 'auth' , user, { // firebase id tokens expire in one hour // set up cookie decease to lucifer expires: 1 / 24 , } ) } export const removeUserCookie = ( ) => cookies. remove ( 'auth' ) This code sets cookies so the user can close the website and reopen information technology and not take to log back in. Brand certain to add together js-cookie via yarn or npm.
User Data
Next, within of map user data, add the following:
export const mapUserData = ( user ) => { const { uid, e-mail, xa, displayName, photoUrl } = user return { id: uid, email, token: xa, proper name: displayName, profilePic: photoUrl } } This once again is taken from the Next.js website. The lawmaking maps the information we are getting to out custom variables.
Custom User Hook
Finally, permit's modify the useUser file. This file has the following tasks:
- create a log out method.
- gives u.s. a hook to get the logged in user anywhere in out app.
- provides an auth listener
Here is the lawmaking:
import { useEffect, useState } from 'react' import { useRouter } from 'next/router' import firebase from 'firebase/app' import 'firebase/auth' import initFirebase from '../firebase/initFirebase' import { removeUserCookie, setUserCookie, getUserFromCookie, } from './userCookies' import { mapUserData } from './mapUserData' initFirebase ( ) const useUser = ( ) => { const [user, setUser] = useState ( ) const router = useRouter ( ) const logout = async ( ) => { render firebase . auth ( ) . signOut ( ) . then ( ( ) => { // Sign-out successful. router. push ( '/auth' ) } ) . take hold of ( ( e ) => { console . error (e) } ) } useEffect ( ( ) => { // Firebase updates the id token every 60 minutes, this // makes sure the react state and the cookie are // both kept upwardly to date const cancelAuthListener = firebase. auth ( ) . onIdTokenChanged ( ( user ) => { if (user) { const userData = mapUserData (user) setUserCookie (userData) setUser (userData) } else { removeUserCookie ( ) setUser ( ) } } ) const userFromCookie = getUserFromCookie ( ) if ( !userFromCookie) { router. button ( '/' ) return } setUser (userFromCookie) render ( ) => { cancelAuthListener ( ) } } , [ ] ) render { user, logout } } consign { useUser } The auth should now work. Attempt to log in with email and password. Annotation, if y'all want to use any of the OAuth providers you will need to plough them on in your firebase auth settings page.
Now that we have auth, we want to dynamically show a custom alphabetize page based on if the user is logged in or not. Make the following changes to index.js.
import Caput from 'side by side/caput' import styles from '../styles/Home.module.css' import WriteToCloudFirestore from '../components/cloudFirestore/Write' import ReadDataFromCloudFirestore from '../components/cloudFirestore/Read' import { useUser } from '../firebase/useUser' export default part Dwelling ( ) { const { user, logout } = useUser ( ) if (user) { return ( <div> <h1> {user. name } < /h1> <h3> {user. email } < /h3> {user. profilePic ? <image src= {user. profilePic } height= { 50 } width= { 50 } > < /image> : <p> No profile pic< /p> } < WriteToCloudFirestore / > < ReadDataFromCloudFirestore / > <button onClick= { ( ) => logout ( ) } > Log Out < /button> < /div> ) } else return ( <div className= {styles. container } > <p> <a href= "/auth" > Log In ! < /a> < /p> < Head > <title> Create Next App < /title> <link rel= "icon" href= "/favicon.ico" / > < / Head > <main className= {styles. main } > <h1 className= {styles. title } > Welcome to <a href= "https://nextjs.org" > Side by side . js ! < /a> < /h1> // the rest is the same Updating Read/Write
Finally, let'due south alter the document name when we send information via cloud firestore. This mode, each user has their data stored in a unique key.
In cloudFirestore folder:
import firebase from 'firebase/app' import 'firebase/firestore' import { useUser } from '../../firebase/useUser' const ReadDataFromCloudFirestore = ( ) => { const { user } = useUser ( ) const readData = ( ) => { effort { firebase . firestore ( ) . collection ( 'myCollection' ) . physician (user. id ) . onSnapshot ( function ( physician ) { panel . log (doctor. data ( ) ) } ) alert ( 'Data was successfully fetched from cloud firestore! Close this alert and check panel for output.' ) } take hold of (fault) { console . log (error) alert (error) } } return ( <push button onClick= {readData} > Read Data From Cloud Firestore < /push> ) } consign default ReadDataFromCloudFirestore import firebase from 'firebase/app' import 'firebase/firestore' import { useUser } from '../../firebase/useUser' const WriteToCloudFirestore = ( ) => { const { user } = useUser ( ) const sendData = ( ) => { effort { firebase . firestore ( ) . drove ( 'myCollection' ) . md (user. id ) // get out as .doc() for a random unique doc name to be assigned . ready ( { string_data: 'Benjamin Carlson' , number_data: 2 , boolean_data: truthful , map_data: { stringInMap: 'Hi' , numberInMap: 7 } , array_data: [ 'text' , 4 ] , null_data: null , time_stamp: firebase. firestore . Timestamp . fromDate ( new Date ( 'December 17, 1995 03:24:00' ) ) , geo_point: new firebase.firestore.GeoPoint ( 34.714322 , - 131.468435 ) } ) . then ( alert ( 'Data was successfully sent to deject firestore!' ) ) } catch (mistake) { panel . log (error) alarm (error) } } render ( <push onClick= {sendData} > Send Data To Cloud Firestore < /button> ) } export default WriteToCloudFirestore That is information technology for Firebase authentication!
Realtime Database
Next, we'll add together realtime database. We will exist edifice a simmple button where when yous printing is, it increments a count. This count is stored in the database and is unique to each user. The count will then be fetched back and displayed to the user.
First, create a component named Counter.js inside of the components/realtimeDatabase binder. Create a basic component.
import { useState, useEffect } from 'react' import firebase from 'firebase/app' import 'firebase/database' const Counter = ( { id } ) => { return ( <button onClick= {increaseCount} > Increase count {count ? count : '–––' } < /button> ) } export default Counter Every bit you can see, the button is called a method named increaseCount. Let'due south create this. To do this, we will utilize the firebase.database().ref().child().off() syntax.
import { useState, useEffect } from 'react' import firebase from 'firebase/app' import 'firebase/database' const Counter = ( { id } ) => { const [count, setCount] = useState ( '' ) useEffect ( ( ) => { const onCountIncrease = ( count ) => setCount (count. val ( ) ) const fetchData = async ( ) => { firebase. database ( ) . ref ( 'counts' ) . child (id) . on ( 'value' , onCountIncrease) } fetchData ( ) return ( ) => { firebase. database ( ) . ref ( 'counts' ) . child (id) . off ( 'value' , onCountIncrease) } } , [id] ) const increaseCount = async ( ) => { const registerCount = ( ) => fetch ( ` /api/incrementCount?id= ${ encodeURIComponent (id) } ` ) registerCount ( ) } render ( <button onClick= {increaseCount} > Increase count {count ? count : '–––' } < /push> ) } export default Counter We ned to create the api route for this.
Create a file named fetchCount.js within of pages/api.
Inside it we can fetch the count.
import firebase from 'firebase/app' import 'firebase/database' export default ( req, res ) => { const ref = firebase. database ( ) . ref ( 'counts' ) . child (req. query . id ) return ref. once ( 'value' , ( snapshot ) => { res. status ( 200 ) . json ( { total: snapshot. val ( ) } ) } ) } Now, lets import the component inside alphabetize.js and use it! Remember to pass in a unique id; I will be using the users uid from useUser.
import Counter from '../components/realtimeDatabase/Counter' // other imports // other code in a higher place < ReadDataFromCloudFirestore / > < Counter id= {user. id } / > // added line <push button onClick= { ( ) => logout ( ) } > Log Out < /button> // other code below Storage
For storage, nosotros only need to create one file. Inside of your components binder, create a folder named storage and so create a file named uploadFile.js. Start create a component with html input and progress.
import { useRef, useState } from 'react' import firebase from 'firebase/app' import 'firebase/storage' const UploadFile = ( ) => { const inputEl = useRef ( null ) const [value, setValue] = useState ( 0 ) render ( < > <progress value= {value} max= "100" > < /progress> <input blazon= "file" onChange= {uploadFile} ref= {inputEl} / > < / > ) } Every bit you can see, we are using useState and useRef to handle the procress indicator and the file upload. To upload the file, we need to get the file, and utilize .put to send it to firebase.
function uploadFile ( ) { // go file var file = inputEl. current . files [ 0 ] // create a storage ref var storageRef = firebase. storage ( ) . ref ( 'user_uploads/' + file. proper noun ) // upload file var task = storageRef. put (file) // update progress bar task. on ( 'state_change' , office progress ( snapshot ) { setValue ( (snapshot. bytesTransferred / snapshot. totalBytes ) * 100 ) } , function fault ( err ) { alert (error) } , function compleete ( ) { alert ( 'Uploaded to firebase storage successfully!' ) } ) } Finally, import this component into index.js!
import ReadDataFromCloudFirestore from '../components/cloudFirestore/Read' import { useUser } from '../firebase/useUser' import Counter from '../components/realtimeDatabase/Counter' import UploadFile from '../components/storage/UploadFile' // added line export default function Home ( ) { const { user, logout } = useUser ( ) if (user) { return ( <div> <div className= {styles. container } > <h1> {user. name } < /h1> <h3> {user. email } < /h3> {user. profilePic ? <image src= {user. profilePic } height= { 50 } width= { 50 } > < /paradigm> : <p> No profile picture show< /p> } < WriteToCloudFirestore / > < ReadDataFromCloudFirestore / > < Counter id= {user. id } / > < UploadFile / > // added line <button onClick= { ( ) => logout ( ) } > Log Out < /push button> < /div> // other code ) Conclusion
With that, we accept successfully added Firebase to our Next.js website.
Source: https://www.coffeeclass.io/articles/add-firebase-to-nextjs
0 Response to "How to Know if You Initialized Firebase"
Postar um comentário